 DavidChatelain
November 3, 2020
DavidChatelain
November 3, 2020
Deploying a Django Project, Part 1: Creating and Managing a Custom Domain Name
I've noticed that the internet is full of helpful tutorials and information about creating Django projects, but they are almost always limited in scope to a local development environment. Where is all the information about deploying a Django project to a live server with a real domain name? With that question in mind, I decided to create a tutorial series on this blog to show new developers how they can deploy their Django apps. In this series, we'll be starting with a project, any project, that works only on your local computer, and we'll finish with a live, functional website with a custom domain name and SSL/TLS certificate (i.e., https or the little lock icon next to the domain name).
I should stress that this is simply how I have deployed my own web applications, and there are many different ways to go about it and tools to use. I am not using Docker, for example, which is an extremely popular tool for containerizing applications. Rather, this tutorial series is largely directed toward new developers who, like I was, are looking for a simple way to deploy their Django projects without getting too fancy.
In this tutorial series, I will be using Namecheap (namecheap.com) to register the domain name and Digital Ocean (digitalocean.com) to host the website. I have used both of these companies for my own websites, and I can recommend them for both price and quality. (Note that I am not sponsored by them, I just like them!)
Lastly, I want to stress that, while this process may seem like a lot when one is just starting, it gets much quicker and easier after one or two times going through this process. I launch websites in this way in less than an hour now, so don't be intimidated!
Buying a Custom Domain Name
I assume that you have a finished, ready-to-deploy Django project, currently living on your local computer. But even if you don't, you can proceed with this part (Part 1) of the tutorial series. Technically, you can actually skip this part all together and do it after deploying your app to a live server, but I prefer to have my desired domain name reserved and set up first.
First, you will want to go to any website that manages and sells domain names, i.e. domain registrars. I personally use Namecheap, but there are many other sites you can choose, such as HostGator, GoDaddy, Domain.com, Bluehost, et cetera.
Search for your desired domain name. If it is taken, you can potentially make an offer to the owner of that domain, but honestly it is unlikely that will go anywhere. You can potentially choose a different top-level domain, such as .io, .org, et cetera, to get your desired domain name. The choice is yours.
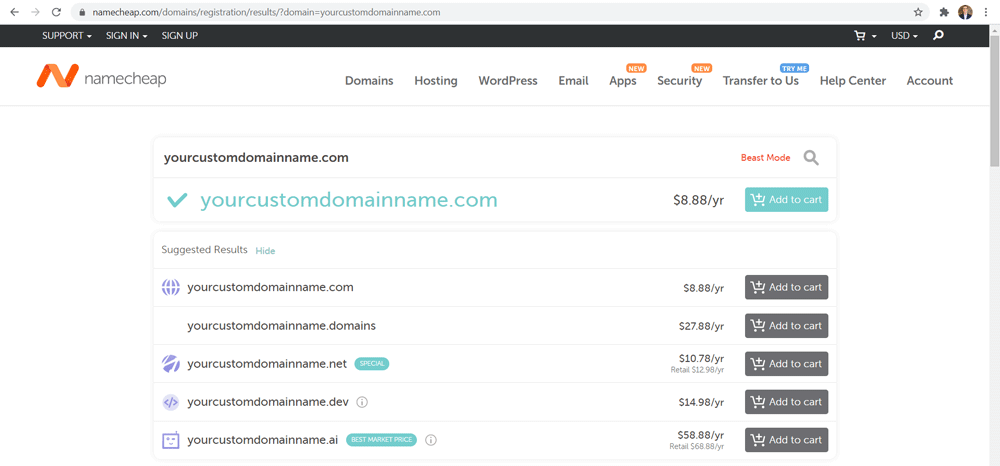
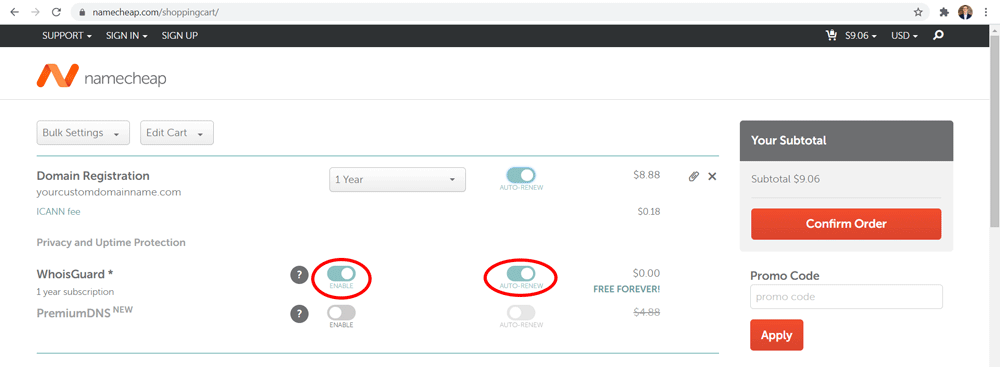
Once you have your desired domain name, complete your purchase. On Namecheap, and I imagine many other domain registrar sites, you can choose to include WhoisGuard for free. And you definitely should! If not, anyone can find your personal information with the domain name. So please, make sure you have WhoisGuard included. You can also choose whether to renew your registration automatically or not.
Pointing Your Domain Name to Your Hosting Service
For the purposes of this tutorial series, I am using Digital Ocean as my example hosting service. If you are using a different company, the process will likely be similar. If you haven't already, make an account with Digital Ocean (or whoever you choose) until you have access to your main dashboard.
Before working on Digital Ocean, we need to point Namecheap (where the domain name is registered) to Digital Ocean's nameservers (where the website's content is hosted). Go to your dashboard at Namecheap and click the Manage button next to your domain (assuming you have already bought it).

Scroll down to the Nameservers section, and change the dropdown menu selection to Custom DNS. Add the following nameservers below:
- ns1.digitalocean.com
- ns2.digitalocean.com
- ns3.digitalocean.com

Of course, if you are not using Digital Ocean, these nameservers will be different. Once you've done this, you will have to wait some time, from about an hour to as much as two days for the changes to take effect. In my experience, it will likely be less than a day, if not a matter of hours.
Creating a Droplet (i.e. Server) on Digital Ocean
With that done, we are finished with Namecheap and can now begin using Digital Ocean. You will have to create an account if you do not already have one, and then you can access your dashboard, where you will create your server and manage your domains. Digital Ocean calls each individual server a "Droplet," so I will refer to your server as a Droplet from time to time throughout this series.
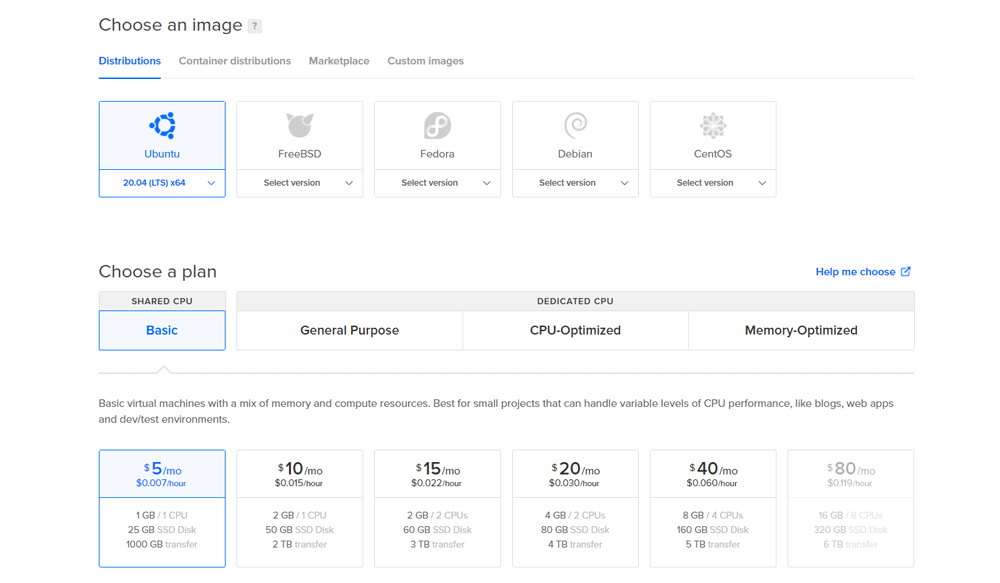
To create a Droplet, click the green Create button at the top right of the dashboard, and click Droplets in the dropdown menu. You will be taken to a page where you will have many choices to customize your server. Choose Ubuntu (version 20.04 LTS x64 or later), and choose the payment plan that you want. If this is a simple web page (such as a portfolio project) that you don't anticipate having much traffic, then I recommend the Basic tier, and the cheapest plan on that tier ($5/month). If you don't have a lot of traffic on your site, you likely won't even pay that much per month. Digital Ocean also offers $100 worth of credit for the first 60 days.

Choose a datacenter region that is near you but also near your likely visitors. Under Authentication, choose "SSH keys" and select the SSH key for your machine. If you do not know about or understand SSH keys, you can start here: https://www.ssh.com/ssh/key/. Windows users may find this link useful: https://ubuntu.com/tutorials/ssh-keygen-on-windows#1-overview.
Under Finalize and create, leave it at 1 Droplet, and give your Droplet a custom name under Choose a hostname. Note that underscores cannot be used, but dashes, or hyphens, can.

Click the green Create Droplet button below, and your Droplet (i.e. server) will be created! Easy!
Adding Your Custom Domain to Digital Ocean
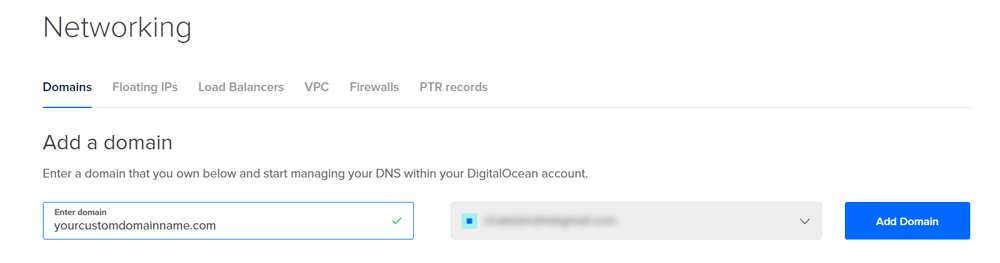
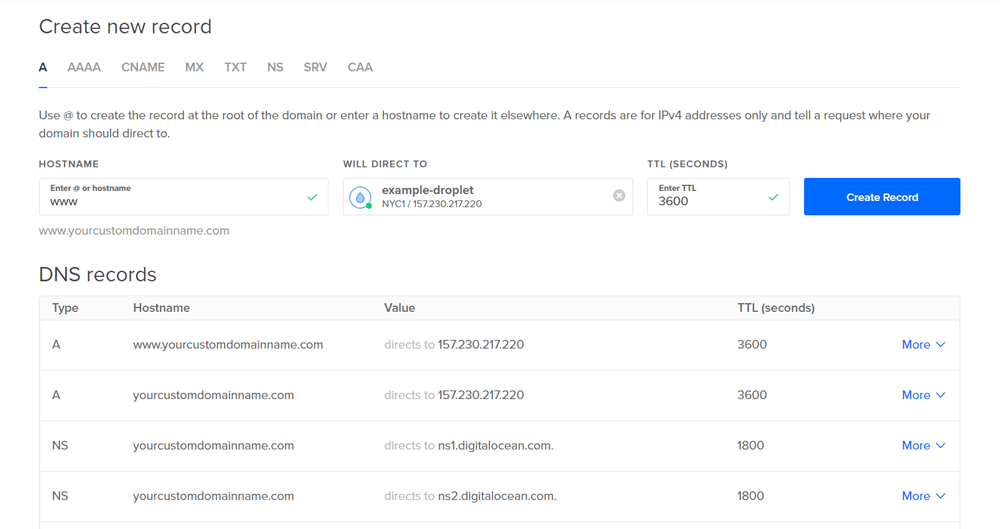
With your Droplet, or server, now ready, you can navigate to the Networking tab in the control panel to the left. Enter your domain name (i.e. "example.com") and click Add Domain.
Your domain name should appear below. Click on it, and you will be taken to a page to add DNS records. To get your website up and running, you can just enter an A record for now.
First, enter the "@" symbol under Hostname, then select your Droplet (your server) under Will Direct To. You can just leave the TTL (seconds) dropdown alone. Then click the button Create Record to the right. You should see the new DNS record appear below as "example.com".
Now repeat this process, but add "www" under the Hostname text field. This should add a second DNS record for "www.example.com". You want to make sure you have both records, and that they both link to the same Droplet.
Once you've done this, your custom domain name is set up! In Part 2, we'll start configuring our server, we'll create an admin-level user to access it, and we'll begin installing some basic dependencies. You can find Part 2 here.
-------------------------------
Full Deploying a Django Project tutorial series:
Part 1: Creating and Managing a Custom Domain Name
Part 3: Configuring Project Settings and Creating a PostgreSQL Database
Part 4: Clone Your Project onto the Server
Part 5: Launch Your Project with Gunicorn and NGINX
Part 6: SSL/TLS Certificate and Continuing Development
Additional resources:
https://www.digitalocean.com/community/tutorials/initial-server-setup-with-ubuntu-20-04